


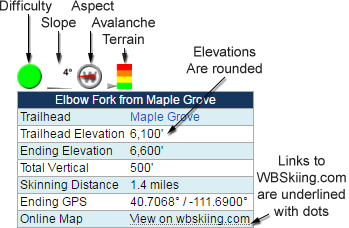
Information tables are used throughout this guide to quickly convey key information. This page provides insight into these tables.
Keep in mind that the info tables generalize the information. In the backcountry, a single "run" may be more than 1,000 feet wide and can contain a variety of terrain. Often your choice of a line can be the difference between easy and extreme skiing.
The info tables display the traditional beginner, intermediate, and advanced symbols. If you've skied at more than one ski area, you've undoubtedly noticed the inconsistencies in the difficulty ratings between resorts. And unfortunately, that inconsistency exists within this website. The ambiguity is inevitable because the runs involve variable terrain that spans the difficulty scale.
Beginner. Good terrain as you develop backcountry skills and when the avalanche danger is higher.
Intermediate. Requires more experience in skinning and skiing.
Advanced. Requires strong skiing and skinning skills.
Expert. Difficult terrain where a mistake can have serious consequences.
Extreme. Insanely difficult chute skiing and beyond.
Skiing in the backcountry is always more difficult than skiing at a resort. If you have to skin up 2,000 vertical feet before you can point 'em downhill, even an intermediate run can feel advanced. Add the fact that you're wearing a backpack, the snow hasn't been groomed, the hazards aren't marked, and the knowledge that even a moderate injury can be life threatening. The bottom line is that you should back-off the more difficult runs until you've gained significant experience. If you're skiing black diamonds at a Utah ski area, you should probably be skiing intermediate runs in this guide. If you're skiing beginner runs at a resort, you should stay at the resort and improve your skills.
The slope icons display the average, sustained slope over the main section of a run in degrees. Even more noticeable than variations in the "difficulty" ratings, the slope is a broad generalization for several reasons. First, it's normal for the slope of every run to vary by at least ±5°. Even the very homogeneous slope shown in the following illustration varies by 10°.
Another reason that you shouldn't read too much into the published slope is due to the dynamic nature of snow—it piles up, melts, creeps downhill, and is transported by the wind.
And finally, measuring the slope of a run is not an exact science. The slopes in this guide were measured using a variety of techniques, including mechanical inclinometers, ski pole mounted digital inclinometers, a handheld digital inclinometer, and cell phone apps. (I developed my own avalanche-specific inclinometer so it would be easier to accurately record, and email waypoints.) A few slope measurements were calculated mathematically from topographic maps and a couple came from other publications.

Most angles were measured from above or from the side of a run. I rarely placed a ski pole on the snow and measured its slope, because that is too short of a sample. I strived to publish the angle that is sustained for a major portion of the run. That will often understate the first 25 feet of a run and will always be steeper than the average from the very top to the very bottom (i.e., I don't include the lower-angle terrain toward the runout or apron).
![]() Remember that almost all avalanches occur between 30° and 45° with the bull's eye being around 38°. Slopes
less than 30° rarely avalanche because they're just not steep enough; slopes steeper than 45° are less likely
to avalanche because the snow is continuously sluffing.
Remember that almost all avalanches occur between 30° and 45° with the bull's eye being around 38°. Slopes
less than 30° rarely avalanche because they're just not steep enough; slopes steeper than 45° are less likely
to avalanche because the snow is continuously sluffing.
When you're considering the avalanche hazard based on the slope angle, be sure to consider the steepness of the snow above and on connected slopes even if you won't be skiing it. It's common for avalanches to be remotely triggered from adjacent low-angle terrain.
Learn about the slope shading on the Wasatch Backcountry Map.
The compass icon shows the average direction that the run faces. Knowing a run's aspect can help you anticipate the avalanche hazard, avoid sun-crusted snow, and dress appropriately.
The example compass icon displayed above shows a run that is facing northeast. In the Wasatch, slopes with this aspect are frequently windloaded and have cornices.
Backcountry skiers share the mountains with other users. The following icons show some of the users you might encounter.
This icon indicates terrain that is commonly accessed by helicopter skiers. I have not marked all of the terrain that is accessible to helicopters, because this website would be full of them (and the truth be told, I need help understanding where they actually ski). The current Forest Service permit excludes helicopter skiing in the tri-canyon area on Sundays and Mondays (with three Monday exceptions per year). You can find out where the Powderbird helicopters will be each day by visiting https://powderbird.com/operations-report/.
This icon indicates terrain that you can access from, and return to, a ski area without using climbing skins (although it may require a little booting).
The "terrain" listed in the information tables can be a combination of the following terms.
The elevation data shows the elevation in feet. The "ascent vertical" is the change in elevation between the trailhead to the highest point. The "skiing vertical" is from the top of the run to the bottom of the run (this ignores the elevation change from the bottom of the run back to the trailhead).
Except for summits (which show the USGS elevations), the elevations are from a variety of sources (usually from digital maps). Most of the elevations have been rounded to 100 feet.
The "skinning distance" is shown for many of the ascents. The distances were either measured in the field (by recording a GPS track) or were created on a digital map. Most, but not all, of the distances include skin-track switchbacks.
Latitude and longitude are provided in decimal degrees and are rounded to four decimal places. (The coordinates are not rounded in the map apps.)
The coordinates for runs are the location of the run's marker as displayed on WasatchBackcountrySkiing.com. These markers are typically placed about a third of the way down the run.
You can help improve WBSGuide.com by sending me your skin tracks.
Distances to trailheads are shown in miles. In Big and Little Cottonwood, the distance is the number of miles past the digital signs that are located at the mouth of the canyons. In Mill Creek Canyon, the mileage is the distance from the entrance booth. Note that your odometer readings can vary based on your car's tire size and pressure. The mileages in this guide were measured on a digital map.
Some route descriptions include times, for example, "After 20 minutes…" These times are very rough estimates of how much time it will take if the skin track has already been set. Do not take them too literally—your actual times can vary from about half as long to several times longer depending on your fitness, urgency, the snow conditions, and how much you and your partners are talking.
Some of the information tables contain an avalanche terrain rating that was published by the Utah Avalanche Center. These ratings are based on the terrain (e.g., slope steepness, slope shape, forest density, terrain traps, avalanche frequency, exposure time, etc) and not the current snowpack. They apply only to the ascent route; significantly more avalanche danger may exist in adjacent terrain. The ratings are generalizations—it is your responsibility to travel safely in the backcountry.
Green. Dangerous avalanches are not expected except during extreme or very unusual conditions.
Yellow. Generally low-angle terrain although the route may cross under steep avalanche run-out zones.
Orange. Some interaction with steep starting zones and/or significant exposure to numerous commonly-occurring avalanche paths.
Red. Significant avalanche terrain often with multiple terrain traps.


